·
9 minute read
·
9 minute read

So, you just purchased HubSpot Marketing Hub! Great! Now … where the heck do you start?
It’s OK. We’ve got you.
We’ve helped dozens of clients through the HubSpot onboarding process—from signing the contract to technical set up to launching their first inbound campaign.
If you’re looking for a deep dive that will set you up for success right out of the gate, you’re in the right place. We’ve got a bookmark-worthy, soup-to-nuts HubSpot onboarding guide that’ll show you:
- Where to begin and why
- Technical set up
- Reports and dashboards you absolutely want to set up
- Five mistakes you don’t want to make
HubSpot can serve as your all-in-one marketing, sales, service and operations platform, which means there’s a lot of ground to cover. This blog would require its own ZIP code if we detailed absolutely everything HubSpot can do. So today, we’re going to focus on setting up Marketing Hub. (Guides for setting up Sales Hub and Service Hub will be coming soon!)
Now that we’ve gotten all of that out of the way, let’s get this party started!
Start With a Solid Foundation
 We get that you’re eager to launch your first campaign. But you need to make sure your infrastructure is in place first. Note: You may need IT support for some of these steps.
Initial Steps to Implement HubSpot Marketing Hub
1. Set Up Users, Teams and Roles
Your first step is to set up users, teams and roles (permissions). Who gets the role of Super Admin? Are there sales or service team members who need limited access? Dedicate a little time to thinking through how your team will use HubSpot and who should have permission to make specific decisions.
Helpful tip: We recommend setting up two-factor authentication (2FA) and requiring it for all users. The great thing about 2FA is it reduces the risk of unwanted intruders accessing your account and wreaking havoc.
2. Create Custom Properties
Next, you may want to create custom properties to capture information outside of HubSpot’s default properties. We like to use these properties when we’re helping clients with segmentation.
(Surprise! HubSpot has a training module for this too.)
Can’t think of any custom properties? Here are a few examples from our clients:
- Company/Contact Type: This is helpful if you sell to different types of companies, such as small businesses and also enterprise businesses, or if you want to track multiple sales channels, like distributors, partners or direct sales.
- Referred by: If it’s important for you to track your referral sources, you can create referral-specific landing pages and add this as a hidden field to the landing page form, which will automatically update this property when a contact submits the form.
- Contract Renewal Date: You can use this date to build workflows that automatically send renewal reminder emails.
3. Set Up Lead Scoring and Lifecycle Stages
Lead scoring in HubSpot is done with the property HubSpot Score. You can set up the HubSpot Score in a number of ways, but we’ve given you a good starting point with this lead scoring template. (Don’t forget to download a copy of the template.)
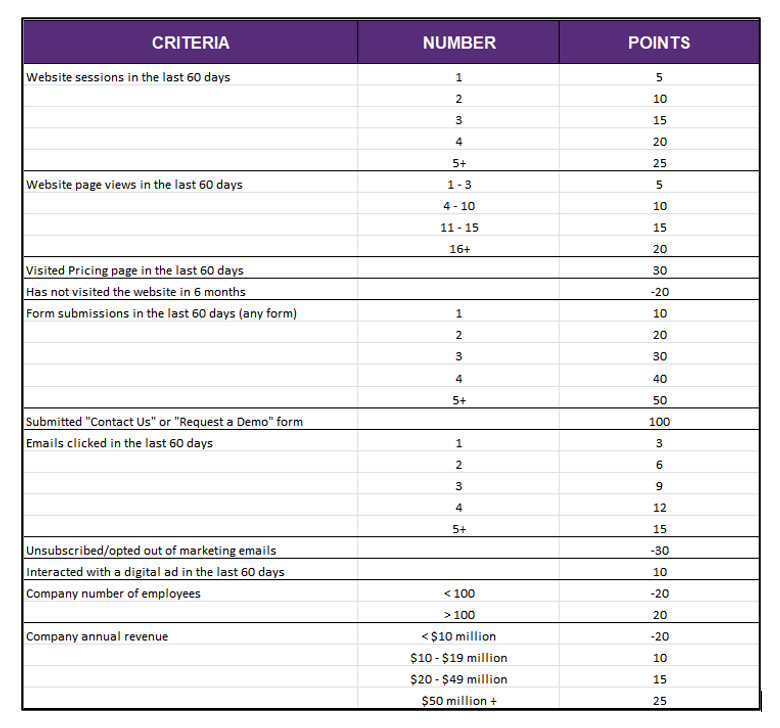
Once your lead scoring system is set up, you can then set lifecycle stage thresholds.
The default lifecycle stages in HubSpot are:
- Subscriber
- Lead
- Marketing Qualified Lead (MQL)
- Sales Qualified Lead (SQL)
- Opportunity
- Customer
- Evangelist
Every company defines these lifecycle stages differently, so definitely discuss this with your sales team and your leadership team so that you all are aligned with how you will define forward progress through your buying funnel.
Related Content: MQLs & SQLs: What Is a Marketing Qualified Lead & Sales Qualified Lead?
The following scoring thresholds can provide a good starting point for those conversations:
| HubSpot Score | Lifecycle Stage | Action to Be Taken |
| 0 - 20 | Subscriber | The marketing team continues to nurture the contact. |
| 21 - 50 | Lead | The marketing team continues to nurture the contact. |
| 51 - 75 | Marketing Qualified Lead | The marketing team notifies the SDR or inside sales representative to follow up with the MQL. |
| 76+ | Sales Qualified Lead | The marketing team immediately notifies the sales team to follow up ASAP and validate the SQL. |
| N/A | Opportunity | The sales team vets the SQL, creates a Deal in HubSpot, and pursues the opportunity. |
4. Set up Your Buyer Personas
It’s also incredibly helpful to add your targeted buyer personas to your HubSpot database. The process for this is fairly straightforward, and this knowledge base article walks you through it.
Related Content: The Marketer’s Guide to Buyer Personas
5. Import Your Contacts and Other Records
Finally, you’re now ready to add your contacts to your HubSpot CRM. You have a few options for this, and this great article walks you through these options.
If you’re using another CRM (Salesforce, perhaps?), you can also shortcut the entire process and sync the two databases instead. Here’s how to get your Salesforce contacts into HubSpot.
Once your contacts have been imported, you can think about other types of records that might also need to be contained in HubSpot. This might include:
- An opt-out list: You need to make sure you don’t accidentally email people who have requested you not to do that.
- Companies: This will be particularly helpful to do if you often have multiple contacts at one company, which frequently is the case for complex B2B sales.
- Target accounts: Definitely do this if account-based marketing (ABM) is part of your strategy.
- Employees: Do this if you’ll be doing any internal marketing.
- Partners or Customers: Do this if you want them to receive your marketing content.
- Deals: If you’ve been tracking sales opportunities in another CRM, you can import those opportunities into HubSpot as deals. This will help you close the loop on your marketing data.
Note that the import process for companies and deals is the same as the import process for contacts.
6. Set Up Contact Lists and Views
Now that you’ve imported your contacts, companies and deals, it’s time to set up contact lists and filtered views. We recommend creating lists for marketing contacts, suppression lists (i.e., contacts who you don’t want to receive certain types of emails), buyer personas, and lifecycle stages.
We also recommend creating filtered views that will enable your sales reps to see new leads created during specific timeframes (today, this week or this month for example).
7. Establish Opt-in and/or Regulatory Compliance Settings
No one likes to receive spam emails – including your contacts. Some marketers prefer to have all of their contacts explicitly opt-in to receive marketing emails. This article walks you through how to set up double opt-in for your emails.
While double opt-in isn’t strictly required for CAN-SPAM laws, it is required that you only send marketing emails to individuals who know you/your company and are expecting to receive emails from you.
Additionally, it’s worth noting that the terms of your HubSpot subscription prevents you from sending marketing emails to individuals on a purchased/rented/borrowed list of contacts.
Last but not least, do a little research to find out if you need to comply with GDPR, CCPA, or any other data privacy and protection policies. HubSpot has built-in GDPR compliance processes that can be turned on with one click.
You’re off to a great start! Now let’s dive into the technical action items still remaining.
Technical Setup
 Your technical set up might require a call (or five) to your IT department, so it’s not a bad idea to give them a heads up before you start.
HubSpot Marketing Hub Technical Implementation Action Items
1. Establish Your Subdomains
You’ll need to set up multiple types of subdomains in HubSpot for various purposes.
Website Subdomain
If you plan to host your website on the HubSpot CMS, you don’t need to bother with connecting a website subdomain.
However, if you plan to host your main website on another CMS (such as WordPress), then you’ll need to set up a subdomain so HubSpot can host your blog posts and landing pages. This article provides a great explanation of what a website subdomain is, and this article walks you through the process of connecting your subdomain in HubSpot.
(Incidentally, there’s no need to get too funky with your subdomain name. Something simple and easy to remember, like explore.company.com or blog.company.com, will work just fine.)
Email Sending Subdomain
You also need a subdomain to use HubSpot to send marketing emails. Like choosing a website subdomain name, you can keep this simple and use your normal company domain (i.e., @clariantcreative.com), but it’s becoming more common to use a subdomain like @email.clariantcreative.com to protect transactional emails in case of deliverability issues.
By the way, if you don’t instantly recognize the acronyms DNS, DKIM or CNAME, now is the time to call your IT contact. They’ll need to access your company’s website hosting provider, and it can be helpful to have someone experienced help you with this.
2. Integrate HubSpot With any Non-HubSpot Website Pages
If your website is not hosted on HubSpot, integrate HubSpot with your CMS (such as WordPress) and install the HubSpot tracking code on any non-HubSpot pages.
We also highly recommend replacing any existing forms—contact us, schedule a demo, etc.—with HubSpot forms. It will be easier and quicker to update all your forms in one place. Plus, you’ll gain access to HubSpot analytics, A/B testing, and other features to help you maximize conversions.
Pro-tip: Make sure to exclude your own internal/employee IP addresses from analytics, as well as the IP addresses from any partners or agencies. When you visit your own site a lot (and what marketing person doesn’t?) it can skew your HubSpot analytics web traffic reports. Find your IP address by going to whatismyip.com, or simply Googling “what is my IP address.” HubSpot also has instructions on how to exclude your IP address from HubSpot analytics reports.
3. Build Your HubSpot Templates
First off, set up your blog with a blog name, header, meta description, tags and URL.
Next, you can leverage HubSpot’s onboarding services (available for all subscription levels above Marketing Starter) to begin building the initial blog, landing page, system pages and email templates. Note that there may be an additional cost for this, depending on your specific HubSpot subscription.
The template buildout from HubSpot can take 2-3 weeks, and then you’ll need to review, approve and possibly clean up the templates as needed.
Once your blog templates are built (including both the template for blog posts and the blog listing page), you can migrate all your existing blogs into your account, which HubSpot can handle for you as well. You just need to make a request to start the process.
You can also add your brand assets (logo, favicon, colors and fonts) with a few menu selections: Settings > Account Defaults > Branding.
4. Set up Your Email Subscription Options
If you’re planning to use a subscription form for people to opt in to receiving emails, you’ll need to set up email subscription types and customize your email subscription preferences page.
You will be prompted to choose how you want your blog subscribers to be notified by HubSpot when you publish new blog posts: instantly, daily, weekly, or monthly. You can also customize the blog subscriber notification emails to make sure the emails represent your tone and messaging.
Word to the wise: If you have a large contact list and you’re using a new email domain, make sure to warm up your list first. Pick 50-100 of your best and/or most engaged contacts to test your emails on them first. If you don’t see any deliverability issues, then you can ramp up and begin sending your emails to more and more of your contacts—all the while watching your bounce and spam rates. If anything looks amiss, stop sending further emails and troubleshoot the issue immediately before you inadvertently hurt your sender reputation.
Related Reading: Are High Bounce Rates Always Bad?
5. Connect Any Third-Party Apps to HubSpot
Many marketers appreciate the convenience of using HubSpot to publish social media content. If this appeals to you too, you’ll need to connect any relevant accounts to HubSpot (including company accounts and even possibly the individual accounts of key thought leaders within your company).
Also, don’t forget to connect your Google Search Console and Google Analytics accounts to HubSpot so you can use that data to provide SEO recommendations for on-page SEO, mobile experience, performance, security and accessibility. (Seriously, don’t skip this step.)
Beyond this low-hanging fruit, HubSpot has hundreds of off-the-shelf integrations with an enormous range of third-party apps. Does your company host monthly webinars? Connect your webinar account to HubSpot, and you can use HubSpot landing pages to drive registrations directly to your account. Does your sales team use Slack for internal communications? Connect your Slack account to HubSpot so reps can receive notifications about lead activity directly in Slack. The list of possibilities goes on and on.
You can find these options in your HubSpot settings under Integrations > Connected Apps, and click on the orange “Visit App Marketplace” button in the upper right corner.
Reports and Dashboards
 Congratulations—you’re almost done with your Marketing Hub onboarding! Your last step is to do some planning around reports and dashboards. Before you dive down the rabbit hole of HubSpot reports, make sure you have a handle on your KPIs.
- What has your team been tasked to accomplish?
- What data will let you know if you are on track to accomplish this goal?
- How will you show your corporate leaders whether you’ve hit your goal?
At the very least, start by measuring your website traffic, leads and conversions. Fortunately, HubSpot gives you a great head start by equipping you with a whole library of reports and dashboards, right out of the gate. This list is by no means complete, but we find it’s a great place to start:
- Marketing Performance
- Website Performance
- Lead Generation
- Lead Activity Report
- Marketing-influenced Opportunities
HubSpot is continually adding to their report library, so be sure to check often and see what new reports are available.
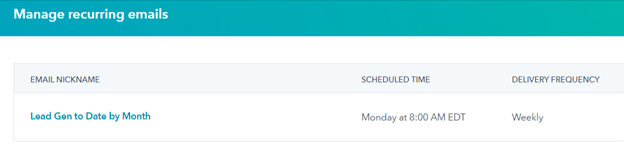
Once you have a few dashboards built out, set up an automated daily/weekly email to automatically send your dashboards to your marketing team (and optionally your leadership team too), so you all can monitor your progress toward your goals together.
 That’s HubSpot onboarding 101, essentially.
Navigating this process does take some know-how, but once you know what to do, we think you’ll find that it’s a relatively straightforward process. And once it’s done, you’ll be ready to roll up your sleeves and start playing around with all your fun new marketing functionality!
Walk Before You Run With HubSpot
We could talk all day about the nuances of HubSpot’s features. But you have to learn to walk before you can run.
Take advantage of every free training module offered through HubSpot Academy. Get comfortable and confident using the basic tools first (like blogging and sending emails), and slowly work your way into more advanced features (like workflows, custom reports and dynamic content).
In your early days with HubSpot, you’re probably going to feel like you’re driving a Maserati at 20 miles per hour. But don’t worry—with time and some first-hand experience, in no time at all you’ll be zipping around hairpin curves and marketing with the best of them.
Even better, as a HubSpot agency partner, we’re always here to help. Reach out to us for support and one of our inbound marketing specialists will contact you.